LightWave Pro Tools
Hundreds of ways to speed up workflow
Intro
This page contains a link to the original ODTools documentation for each of the tools in the 2018 and 2019 collections, now included in LightWave 2023 as LightWave Pro Tools. The 243 entries prefaced by an x have no written documentation. There is video documentation for 215 of the 413 tools here and here, with links to individual videos where available.
The total quantity of these plugins is quite overwhelming and there's no way you'll use all of them. The trick is to skim over the descriptions and find a few that will really help your workflow, so here's a list of where to start. It's compiled by our top beta testers, people who spend hours in LightWave every day so you know it'll be good.
It would be surprising if you used more than 50 of these plugins regularly. The trick is that the 50 essential plugins will be different for everyone.
Modeler top pluginsWeld Clean and Weld Average Clean
Lewis
Modeler top pluginsLayer Panel Pro
Lewis
Modeler top pluginsUDIM tools
Ben
Modeler top pluginsSet Position
Tim
Modeler top pluginsQuadfill
Shaun
Layout top pluginsInstance baker
Tim
Layout top pluginsClones to Instances
Tim
Layout top pluginsLayout primitives
Jason
Layout top pluginsInstancer GL display
Mauro
Layout top pluginsCamera Zoom tool
Ben
Layout top pluginsSuperVehicleSetupPro and TrailerMover
Lewis
Layout top pluginsSnapshots
Ben
Top generic pluginsPresets panels for FFX, HDR environments, IES, Instancers, Layout Models, Surfaces (with images), Motions, Nodes, Scenes, Turbulence, VDB, Volumetrics and more
Ben
Top plugin links to external softwareLink to RizomUV
Lewis
Top plugin links to external softwareLink to RizomUV
Shaun
Top plugin links to external software3D Coat applink
Jason
Top plugin links to external softwareBlender FlipFluids link
Ben
How to assign plugins to a key or add them to a menu
Assigning something to a key is simple. All you need to do is hit Alt-F9 or choose Edit > Edit Keyboard Shortcuts...
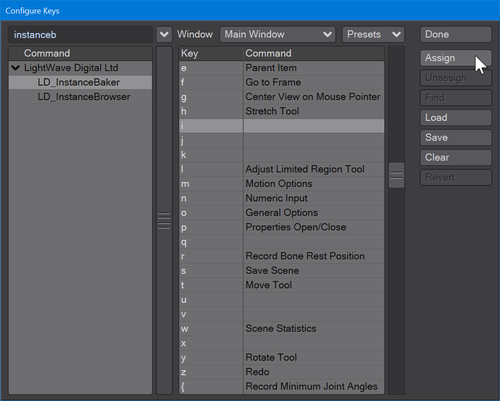
Find the plugin you want in the left menu, here I've chosen the Instance Baker. In the right window, I've scrolled down until I've found a keyboard shortcut I like and I've selected it. Now I can click Assign at top right and Done. Now, I can hit i to bake my instances instead of having to find the plugin every time. You can also replace standard keyboard shortcut items with the improved Pro Tools versions.
Pro Tools will have their own menu by default when you install LightWave, but adding plugins to menus to customize your setup is equally simple. Go to Edit > Edit Menu Layout... or use Alt-F10 and this window appears.
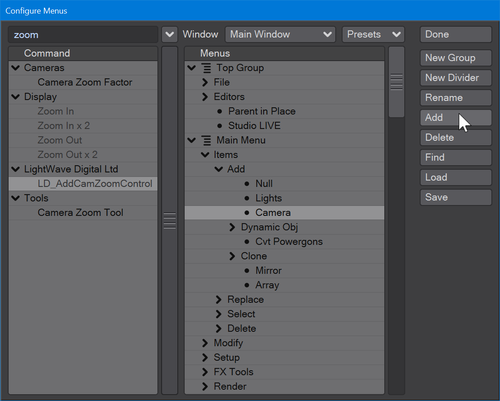
Type in the search window or scroll the left menu to find the plugin you want. Here we're using the CamZoom Control. In the right menu, scroll down and open hierarchies to find the perfect place to put it. You can also replace standard menu items with the improved Pro Tools versions.
Adding a plugin to a mouse button
To add a plugin to a mouse button, you need to add it to a keyboard shortcut first. It doesn't matter how difficult the shortcut is, or how memorable. You'll never use it directly. Now, open up your mouse driver software. Here, I am showing the Logitech Logi Options+ application that controls a wide range of mice, your application might be different.
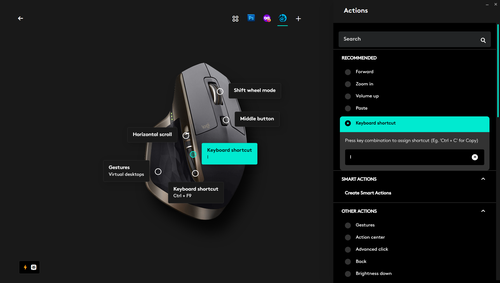
Add the application for which you want to assign this button. If you don't do this, the keyboard shortcut you want for LightWave specifically will be used for all applications. Click the mouse button you wish to use and choose Keyboard shortcut. Now, type the keyboard shortcut you chose for your plugin and from here on you will just be able to click a mouse button to use the plugin you chose in LightWave.
The video demonstrations linked here will be replaced little by little by LightWave Digital and this page will be accordingly updated. If there's a plugin from this collection that you really like, tell me why. Let me know at docs@lightwave3d.com and I might add your recommendation to the list at the top.
Setup
Setup Plugins
- ProjectSwitcherMod | Project Switcher (video)
- MODConfigs | Config Manager (video)
- LayerPanelPro | Layer Panel Pro (video)
- GetFromLayout | Get Objects from Layout
- xSendToLayout | Sends Objects to Layout
- 3DCoatApplinkModeler | 3D Coat Applink
- xDirectoryCollapser | Directory Collapser (video)
- EasyVoxModeler | Easy Magica Voxel (video)
- LWMod2SubstPainter | Send Model to Substance Painter
- IdentifyBone | Identify Bone (video)
- IdentifyVmap | Identify Vertex Map
- InvokeModCMD | Invoke Modeler Command (video)
- xModelerPresets | Model Presets
- ModReload | Reload Model
- StoreFileWithObject | Store a file in an object
- RestoreFileFromObject | Restore File from Object
- RenameSkelegons | Rename Skelegons (video)
- SetViewportPositionToPolygon | Puts the camera perpendicular to the selected Poly
- ShowImageConnectionsModeler | Shows which images are connected to Models (video)
- StorePivot | Store Pivot (video)
- RecallPivot | Recall Pivot (video)
- xCreateSceneObjectFromClipboard | Create Scene Objects from Clipboard
- ModCopyObject | Copy Object to Clipboard (video)
- ModPasteObject | Paste Object from Clipboard (video)
- MoveByPivotOffset | Move by Pivot Offset
- NurbsObjToCurve | Convert Nurbs .obj to Curve
- CreateGeoModeler | Create Geo Modeler
- PasteInvSelected | Paste Invert Selected
- PasteLayoutTransform | Paste from Layout & Transform
- xPasteModelerDispPointInfo | Paste Displaced Points in Modeler
- xPolyToMotion | Convert Polygons to Motions
- xProcessObjectSeqToMotion | Convert Object Sequences to Motions/MDDs or Morphs (video)
- SetPivotToSelection | Sets the Pivot to the center of your selection (point/edge/poly) (video)
- xSceneToIndividualLayersModSplit | Splits MultiLayer Objects into Single Layers - works in combo with the other Scene to layer plugins
Modeler
Modeling Plugins
- ChangePolyDir | Change Poly Direction (video)
- Circlify | Circlify (video)
- ContourCurve | Create Contour Curve (video)
- polyCleanUp | Polygon Cleanup
- PolySplit | Split Polygon (video and video)
- QuadCojoin | Collapse cojoined Quads (video)
- QuadFill | Fill holes with Quads (video)
- SubDHard | Change SubD Weight to Hard
- SubDHarden | Harden SubD Weights
- SubDSoft | Change SubD Weight to Soft
- SubDSoften | Soften SubD Weights
- SubDiv2PtPolys | Subdivide 2pt Polygons
- subDivCurve | Subdivide Curves
- WeldAvgClean | Weld Average & clean junk geometry
- WeldClean | Weld & clean junk geometry
- MeasureCircle | Measure Circle
- MergePntsClean | Merge Points & Clean Junk Geometry
- IdPolySurface | Identify Polygon Surface
- RotateNormals | Rotate Normals
- RotateToAxis | Rotate To Axis
- SetPosition | Set the position of Object
- ConvSelTo2ptPolys | Convert Selection to 2pt Polygons (video)
- ReCenterObjToAvgPntSel | Recenter Object to average Point Selection
- FFXStyleToGeometry | Convert FFX Style to Geometry (video)
- GeometryToFFXStyle | Convert Geometry to FFX Style (video)
- xSmoothInternal | Takes the polygon selection, and smooths the points within its outline points
Layer Plugins
- Layer Panel Pro | Replacement Layer browser (video)
- CopyLayerAndName | Copy Layer & Name
- CopyLayersToNewObject | Copy Layers to new Object
- CreateLayerFromSelection | Create Layer From Selection
- CutLayerAndName | Cut Layer and Name
- PasteLayerAndName | Paste Layer & Name
- SaveLayersAsLWO | Save Layers as individual LWOs (video)
- SelFgLyrRange | Select Foreground Layer Range (video)
- SelBgLyrRange | Select Background Layer Range (video)
Surface Plugins
- xBatchFormatConversion | Batch Format Conversion (video)
- ModSurfaceRenamer | Rename Surface (video)
- xConsolidateSurfaces | Consolidate Surfaces (video)
- CreateSurfaceFromLayer | Create Surface from Layer (video)
- CreateSurfaceFromLayerAndColor | Create Surface from Layer & Color
- ModExtractSurfPolys | Extract Surface Polygons
- vxModSurfaceToWeightMap | Convert Surface to Weightmap
- xRandomizePolyMaterials | Randomize Polygon Materials
- RandomizeSurfaceBaseColors | Randomize Surface Base Colors (video)
- xRemoveSelectedSurface | Remove Selected Surface (video)
- xStoreMaterial | Store Material
- xRestoreMaterial | Restore Material
- xStoreMaterialSlot | Store Material Slot
- xRestoreMaterialSlot | Restore Material Slot
- StripNonAscii | Strip non-ascii Characters from Surfaces
- SurfaceNamesByColor | Change the Surface Name to its Color
- SurfacePush | Surface Push (video)
- SurfPolyDeSelect | Surface Polygon Deselect (video)
- SurfPolySelect | Surface Polygon Select (video)
- PolySurfaceCopy | Takes a polygon's surface, duplicates the surface and renames it
Selection Plugins
- xSelectionMirror | Mirror your selection (not the geometry, but selection)
- StoreEdgeSelection | Stores Edge Selections (video)
- ReStoreEdgeSelection | Restore Edge Selection (video)
- xSelByConnectedNormal | Select connected polygons with same Normal
- SelectHardEdges | Select hard Edges
- SelectPointByWeight | Select Point by Weight
- SelectPointInPoly | Select Point in Polygon
- xSelectWithObjectVolume | Select any points that fall within the volume in the background
Development Plugins
- CreateCustomObjectOutput | Create Custom Object Output (video)
- xmodObjectDeconstruct | Object Deconstruct
- PolyVertexOrder | Show Polygon Vertex Order (video)
UV Plugins
- xCreateUV | Create UV
- xCopyUV | Copy UV
- xPasteUV | Paste UV
- xMergeUVs | Merge UVs (video)
- xApplyUVsFromObj | Apply UVs from Object
- xUDIMConvert | Convert UDIM between Tiles and Layersets (video)
- UDIMMoveDown | Move UDIM tile down (video)
- UDIMMoveLeft | Move UDIM tile left (video)
- UDIMMoveRight | Move UDIM tile right (video)
- UDIMMoveUp | Move UDIM tile up (video)
- xUDIMUVMover | Move UDIM tile to specific ID (video)
- xUVQuadRandomize | Randomize Quad UVs (video)
- xUVRotate | Rotate UVs (video)
- xUVScale | Scale UVs (video)
- xUVStraighten | Straighten UVs (video)
- xModCreatePolyUVGrid | Create Polygon UV Grid
- ConvertToDisconUVs | Convert to Discontinuous UVs (video)
- SendToRizomUV | Send Object to RizomUV (video, video)
- GetFromRizomUV | Get UV from RizomUV (video, video)
- RizomUVAuto | Automatic UV Unwrap via RizomUV (video, video)
- RizomUVExportUVAsPS | Save UVLayout to File via RizomUV (video, video)
- SendToUVLayout | Send Object to UVLayout
- GetFromUVLayout | Get UV from UVLayout
- GetFromUVLayoutAndQuit | Get UV from UVLayout & Quit
Vertex Map Plugins
- xTransferMaps | Transfer Vertex Maps
- xBakeToVtxNormalMap | Bake Vertex to Normal Map
- xCreateVertexNormalGroup | Create Vertex Normal Group (video and video)
- DisplayPolyNormal | Display Polygon Normal
- VertexColor2Weight | Convert Vertex Color to Weight
- Weight2VertexColor | Convert Weight to Vertex Color
- xZeroWeightPoints | Show Non weighted Points and select them
- xImportObjWithNormals | Import Object with Normals
UNSORTED Plugins
- xModLoad | Load
- xModSave | Save Model
- xModLoadFilename | Load Filename
Layout
Channel & Envelope Plugins
- Clamper | Clamp individual Channels (video)
- ChannelReducer | Reduce keys of an envelope (channel) (video)
- DisableChannels | Disable Channels (video)
- Csv2Env | Copy CSV file to envelope
- E_ChannelModify | Modify Enveloped Channels outside of the Graph Editor (video)
Development & Debugging Plugins
- xAutoGui | Create Auto Gui for development (video)
- GeometrySpreadsheet | Geometry Spreadsheet to monitor values
Instancing Plugins
- xBakeToFileInstance | Bake instances to a file (fileInstances)
- xAddInstancerDisplay | Choose your Instancer display mode and percentage
- xInstanceDisplayMaster | Instance Display Master
- xInstanceBaker | Bake Instances (video)
- xInstanceBrowser | Browse all Instancers
- xInstanceRandomizer | Randomize Instancer Settings/Distribution (video)
- xInstancerSeedRandomizer | Randomize Instancer Seeds
- xInstToPoints | Convert Instances to points (video)
- DisableInstancers | Disable Instancers
- EnableInstancers | Enable Instancers
- xSelectedClonesToInstances | Convert selected clones to Instances (video)
- xFileInstance | Load a file Instance and setup the instancer (much much faster than native instancing) (video and video)
- xCloneToInstanceMasterUpdate | Animateable Lights/Cameras Master
- xLightCameraClonetoInstancers | Clone Lights/Cameras to Instancers (video)
Buffer/Passes Plugins
Here's a video for all of these:
- xAOVAddAO | Setup Ambient Occlusion Buffer
- xAOVObjGroup | Setup Individual Object Buffer
- xAOVPerObject | Setup Per Object Buffer
- xAOVPerObjectSurf | Setup Per Object/Surface Buffer
- xAOVSurfGroup | Setup Surface Group Buffer
- xColorIDAOV | Create a ColorID (clown) buffer (video)
- xDepthAOV | Create a Depth Buffer
- xInstanceIDAOV | Create and Instance ID (clown) Buffer (video)
- xObj2AOV | Create custom buffers based on object(s)
- xCreateLightPass | Create Light Buffer
- xPartsIDAOV | Create an object parts color (clown) buffer (video)
Visibility & Display Plugins
- xViewportGuides | Setup Viewport Guides like Photoshop Guides (video)
- InstanceIDs | Display Instance IDs
- CustomObjName | Show the Items name as Custom Object
- MddPreview | Display MDD as a preview (video)
- ShowSpeed | Display the speed of an item (video)
- ShowUV | Show the UV in Layout (video)
- VertexIDs | Display Vertex IDs
- VisHideSelected | Hide selected objects in OpenGL
- VisHideSelectedHierarchy | Hide selected object hierarchy in OpenGL
- VisIsolateSelected | Show only selected object in OpenGL
- VisIsolateSelectedHierarchy | Show only selected object and its hierarchy in OpenGL
- VisRestoreAll | Restore Object OpenGL visibility from stored values (video)
- VisStoreAll | Store Object OpenGL visibility (video)
- RenHideSelected | Remove selected objects from rendering
- RenHideSelectedHierarchy | Remove an object and its hierarchy from rendering
- RenIsolateSelected | Render only selected object
- RenIsolateSelectedHierarchy | Render only the selected object and its hierarchy
- RenRestoreAll | Restore object rendering states to stored value
- RenStoreAll | Store object rendering states
Setup Plugins
- Bugs | Submit LDTools Bugs
- Chat | Goto LDTools Discord Chat
- Configs | Config Manager (video)
- 3DCoatApplinkLayout | 3D Coat Applink
- AddCamZoomControl | Adds a simple Zoom Control Setup for a Camera (video)
- xAddNoHubPro | Hub Replacement
- xAddSceneSampleCalculator | Render Sample Calculator
- xBCF2VDB | Convert BCF Turbulence FD outputs to VDB
- Gridify | Arrange all selected Items in grid form (video)
- CreateMeshLight | Convert Object to Mesh Light
- xEasyBendDeform | Setup a bend deformed (video and video)
- xEasyInstantMesh | Using Instant Meshes for automatic retopology
- xEasyTextureBake | Easy texture baking such as highres to lowres mesh (video)
- EasyVoxLayout | Easy MagicaVoxels Setup
- xSceneToIndividualLayersPrep | Compiles a list of all Objects/Layers in scene
- xSceneToIndividualLayersApplyPrepped | Replaces split multilayer Objects as single layer to the scene
Surfaces & Materials Plugins
- xAddSurfaceLink | Link Multiple same-named surfaces and edit as one (video)
- xClipboardToSurf | Create Surface from Clipboard
- vxConvertBatch | Batch Convert standard T channels to Nodes (Native & Octane)
- xCopySurfaceToSameName | Use this to copy surface properties from one object to another with the same surface name
- xLayExtractSurfacePolys | Create a new Object from the selected surface (video)
- xCopySurfNode | Copy Surface Node (video)
- xPasteSurfNode | Paste a surface Node (video)
- xImportNodesToObjects | Import Nodes to objects
- xLayRestoreMaterialSlot | Restore Material from Slot
- xLayStoreMaterialSlot | Store Material in Slot
- xMergeObjectSurfaces | Merge Object Surfaces
- xOctaneUDIMTextureSetup | Create Octane UDIM Setup (video)
- xRemCustBuffersFromSurface | Remove any custom buffers from an object's surface
- xRenameSurfaceAsObjectName | Rename a surface to include the object's name (video)
- ResetMaterial | Reset Material (video)
- xRewireNodes | Rewire nodes in Node editor (video)
- SurfaceArea | Calculate the surface area (video)
- SurfaceCleanup | Remove unconnected nodes from a material (video)
- xSurfaceCopyWildcard | Quick deployment of similar "type" materials
- SurfaceRenamer | Rename Surfaces
- xSurfDirectory | Apply saved surface to all objects in a directory
- xSurfToClipboard | Copy a surface to clipboard
- xSurfVariations | Create variations of an object based on multiple surfaces saved in a directory
- WeightsFromSurfaces | Create Weights from Selected Surfaces (video)
- ExternalSurfaceOverride | Overwrite a surface with an external file (video)
- SurfaceLink | Link Mulitple same named surfaces together
- xSurfaceSnapshots | Surface Snapshots for easy look development (video)
- xObjSurfaceReplaceMaster | Surface Master for Object Replacements
- SelectedNodesToCompound | Takes selected nodes and creates a compound node (video)
Scene Reference Plugins
- xAddRefScene | Add a Reference Scene
- xAddSceneReferences | Scene References
- xRenderabilityRefScene | Set the render state of a reference scene
- xSceneReferences | SceneReferences
- xRefreshRefScene | Refresh a loaded reference scene
- xCheckForUpdatedRefScene | Check for an updated Reference Scene
- xDisableRefScene | Disable a reference Scene
- xDisableRefSceneBBox | Disable a reference Scene but show bounding boxes
- xUpdateRefSource | Update a reference Scene
- xVisibilityRefScene | Change the visibility of a reference scene
- xExportHierarchyAsNewRefScene | Export a hierarchy as a new reference scene
Rendering Plugins
- LD_LWSN_Command | Show the LWSN command line render commandline
- LD_LWSSplitter | Split Scene into multiple subscenes for rendering
Transform & Motion Plugins
- xBakeBulletSim | Bake a bullet simulation into motion channels
- xEasyBake | Easy bake motions and removing expressions/modifiers/etc (video)
- xAnimationLayers | Animation Layers allows for simple layering/adjustments of motions (video)
- CopyXF | Copy Transforms
- CopyLayoutTransform | Copy Layout transforms (video)
- xHierarchyHMot | Save Hierarchial Motions (video)
- xHierarchyHMotLoader | Load Hierarchial Motions
- xImportHMotToSelection | Import hierarchical motions to selection only (video)
- xRestOnGroundCeiling | Rest an object on the ground or ceiling (video)
- PasteXF | Paste a transform from clipboard (video)
- xMatchItemToTarget | Match a new item's position/rotation/scale to a target item
- xMergeMotionsFromScene | Merge the motions from another scene
- xSwapItems | Swap two items (their motions) (video)
- TargetChildren | Each object sets up a target to point to its child
- TempTarget | Create a temporary target
- xPointSnap | Snap an item to the position of points/polys on another Object (video)
- curTransToKeyZero | Set the current transforms to key at frame 0 (GUI) (video)
- curTransToKeyZeroNoGui | Set the current transforms to key at frame 0
Placer & Distribution Plugins
- xObj2PoissonSampledPoints | Poisson Sampler for point distribution on objects via MeshLab (video)
- xEnvImgTracer | Create an equirectangular image with positions for light/reflection hits (simple HDRLight Studio) (video)
- xInteractiveNullMotion | Setup interactive nulls on objects and create a motion (video)
- xObjectPlacer | Place Objects on other Objects (video)
- xBonePlacer | Place a Bone interactively on other objects (video)
- xLightPlacer | Place Lights by clicking on glancing/reflection angles of an object (video)
- xInterActiveReparent | Interactively setup a new parent to an object (videobj
UNSORTED Plugins
- xDisplacementImageRead | Read Image Pixel values and apply as displacement
- xLinkToPoint | Link an object to the position of another point (video)
- xBuildObjSeqList | Build an Object Sequence List
- xCacheMasterSetup | Setup Cache Master for easy caching and performance increases (video)
- xCalculateFFXLength | Calculate FiberFX Hair Length (video)
- ChangeConfigParameter | Changes config file parameters. Use with caution
- xChangeSubPatch | Change SubPatch Level of multiple objects
- xClipBoardToItemInfo | Get Item Info from Clipboard
- xCloneItemToSelection | Clones a scene item to selected scene items
- xConsolidateScene | Consolidate objects of the same name in a scene
- xConvMot2Spline | Convert motion to spline (video)
- xCopyAndReplaceExternalImages | Copy external content directory images into the content folder and relink
- xCopyLayoutDispPointInfo | Copy Point Displacement info to clipboard (video)
- CopyObjectFilename | Copy current selected Object Filename
- xCreateBoneChain | Create a Bone Chain
- xCreateEnvSphere | Create an environment sphere (video)
- xCreateKeyPro | Creating keys with extra options (video)
- LoadVDB | Loads a .vdb file and sets up a Fog Volume or Levelset VDB
- CreateVDB | Create a Fog Volume or Levelset VDB (video)
- CreateVDB as Proxy | Create an object proxy via vdb, and optionally setup for render replacement (video)
- xDeleteKeyPro | Deleting keys with extra options (video)
- DeSelectNulls | Deselect all Nulls (video)
- xDirectoryLoad | Load all objects in a directory
- xDisableDisplacement | Disable Displacement
- xDisplacementImageWrite | Write the point displacement into a Imagefile
- xEnableDisplacement | Enable Displacement
- xExportMultiMDD | Export Multiple objects as single MDD/Object
- xHandlerStatusChanger | Change the status of a Server pane
- xImageBillBoard | Create Image Billboards from images (video)
- xInsertBetween | Insert an item in-between two other items (video)
- xInvokeLayCMD | Invoke Layout Commands (video)
- xItemDependencies | Show all item inter-dependencies (video and video)
- vxItemInfoToClipBoard | Copy Item info to the clipboard
- xItemPolygonStatistics | Shows the polygon quantities for selected objects
- xItemsToPFX | Convert Item positions to .pfx particle data
- xItemToCamera | Move Selected item to the camera (video)
- JustDelete | Delete Item, without gui
- JustSave | Just save an item, without gui
- xLayCopyObject | Copy an Object to clipboard (video)
- xLayCreatePolyGridUV | Create Polygon UV Grid
- xLayIdentifyUVMap | Identify which UVMaps belong to the object (video)
- xLayLoad | Loads object
- xLayoutAbsSize | Absolute Size of Object (video)
- xLayPasteObject | Paste Object from clipboard (video)
- xLaySave | Saves object
- xLayUpdateSelObjs | Reload selected objects
- xLightExclusionLister | List Light Exclusions
- xLocalizeToContentDir | Copy all external loaded content into the content Folder
- LockUnselected | Lock Unselected Items
- LW2SubstPainter | Send Object to Substance Painter (video and video)
- xMappingToObjectUV | Set the Texture Mapping to Object UV
- xMeshHandlerOrder | Change the Mesh Handler Order
- xModelPackager | Package a model to be self-sustainable
- xObjectsToDir | Copy all selected objects & textures to a directory
- xObjectsToLwo2 | Save Objects as LWO2 (pre 2018) format (video)
- xObjVtxToNulls | Create a Null at each point of an object (video)
- xOpenGLPreview | Create an OpenGL Frame based preview with many options (video)
- xOpenImageIn | Send an Image in Photoshop/etc (video)
- xOpenSnapShotGui | Surface Snapshot for fast lookdev development
- xPBRImporter | Import PBR Texture sets and setup automatic materials (video and video)
- xPFXToNulls | Convert .pfx particle data animated Nulls (video)
- xLD_PolyFromItems | Create a poly from other items pivot positions
- PrimitiveLayout | Create various uv'ed and subd friendly primitives (video)
- ProjectSwitcher | Project Switcher (video)
- xQuickIKChain | Setup a quick IK Chain (video)
- xRandomizer | Randomize Values (video)
- xReloadObject | Reload Object
- xRemoveLDMasters | Remove all LD Master Plugins
- xReplaceByPolycount | Replace objects if their polycount/bounding box matches - creating clones (video)
- xReplaceImageExtension | Replace an Image by extension (for example switch between jpg and png) (video)
- xReplaceMultipleWithObjectLayer | Replace multiple objects with an object layer (video)
- xReplaceObjSets | Replace Object Sets (like hierarchies that you have multiple times in a scene)
- xReplaceWithNull | Replace any Item (Light/Camera/Bone/Object) with a Null
- xRizomLayoutBridge | RizomUV Bridge (video)
- xSaveChangedObjects | Save only changed/updated objects
- xSaveSceneAs0 | Go to frame 0, then save the scene - important for bullet simulations to avoid calculations on scene load
- xSaveSelectionAsLWO | Save the Selected objects as .lwo file (for example, when you imported .obj's) (video)
- xSaveTransLoad | Save Object as transformed and reload item
- xSaveUnsavedObjects | Save objects that haven't been saved yet
- xSceneQuickSetup | Quick Scene Setup (video)
- xSceneSelectionToClipboard | Copy Scene Selection to clipboard
- xSelectClones | Select all clones of an item (video)
- xSelectionToChain | Create a Parent chain from the selection (in order) (video)
- xSelectItem | Select an Item (video)
- SelectNulls | Select all Nulls (video)
- xSelectObjectsBySurface | Select objects by surface selected in the Surface Editor
- xSelectObjectsByWildCard | Select Objects by wildcard (video)
- xSelectSurfFromObject | Select the surface from an object
- xSelMeshFromSurf | Select mesh from picked surface (video)
- SendToModeler | Send selected objects to Modeler
- xGetFromModeler | Get objects/Layers from Modeler
- xSetTextureImage | Create an Image Node from the selected image(s) (video)
- xSetupBakingCam | Setup a surface Baking Camera
- ShowImageConnections | Show all image connections (video and video)
- xSplineCtrlSwitch | Switch between a spline control and motion setup (video)
- xSuperVehicleSetupPro | Simple Vehicle Setup (video and video)
- xT2Nodes | Convert standard T materials into nodes (native & octane)
- xThumbNailer | Create Thumbnails of Objects
- ToggleProxies | Toggle between objects and their proxy objects
- xToggleSubDsAndSave | Toggle the SubD Switch and save object
- xUnCloneObject | Unclone an object (video)
- UnLockAll | Unlock All Items
- Videos | LDTools Videos
- xViewportGuidesAdd | Setup Viewport Guides (ala Photoshop)
- xVolumeLightFix | Setup a nodal fix for volumetric lights (sampling/noise) (video)
- xVPRToIview | Send the VPR rendered frame to the Image viewer (video)
- xDeflyFast | Simply Firefly Remover
- x2ptPolyInstanceFit | Fit Instances on 2pt Polygons (video)
- xSkyGradSetup | Simple Backgound gradient setup that emulates change of day (video)
- xBoneWeightDisplay | Show a bones weight display
- xLayWeightDisplay | Show Weights of an object (video)
- xAllItemNames | Display All Item Names in viewport
- xAllObjNames | Display all Object Names in viewport
- xCacheMaster | Cache Master Setup
- xDisableAnyEnvelope | Disable Any Envelope
- xItemAnimSwitch | LD Item Anim Switch (video)
- xItemFrameSwitch | Link a framerange to a specific item
- xNoHubPro | Hub Replacement
- xObjectLimitedRegion | Sets up limited regions to only encompass selected object(s) (video, video and video)
- xSceneInfoOverlay | Scene Information OpenGL Overlays
- xSceneSampleCalculator | Calculate Samples being used in a scene
- xTrailerMover | Setup of realistic Trailer movements (video)
- xObjectSeqReplacement | Object sequence replacement that also updates surfaces
- xRenderTimeReplacement | Sets up rendertime displacement, different objects in openGL versus rendering (video)
Presets and Standalone
Preset Plugins
The Pro Tools presets system is an excellent way to manage your building blocks for great scenes. (video and video
- xPresetCfg | Presets Config
- xFFXPresetsMaster | FiberFX Presets Master (video)
- xHDREnvPresetsMaster | HDR Presets Master (video)
- xIESPresetsMaster | IES Light Presets Master (video)
- xInstancerPresetsMaster | Instancer Presets Master (video)
- xLayModelPresetsMaster | Model Presets Master (video)
- xLaySurfacePresetsMaster | Surface Presets Master - also includes images in presets
- xMotionPresetsMaster | Motion Presets Master (video and video)
- xNodePresetsMaster | Node Presets Master
- xScenePresetsMaster | Scene Presets Master (video)
- xTextureImagePresetsMaster | Texture/Image Presets Master (video)
- xTurbulenceFDPresetsMaster | TurbulenceFD (TFD) Presets (video)
- VDBPresetsMaster | VDB Presets Master (video)
- VolumePresetsMaster | Volume Presets Master (video)
- VolumetricsPresetsMaster | Volumetric Presets Master (video)
- PFXPresetsMaster | Particles Presets Master
Standalone Applications
- AlembicParticlesToPFX | Convert Alembic Particles to PFX
- FBXSubstancePrep | Prepare FBX For Substance Painter
- FileInstanceFile2LWO | Convert File Instances to LWO
Unmatched Videos