File
- New Project - Clears the scene and starts a new one. Keyboard shortcut: Ctrl+N;
- Load Project - This loads a CSculpt project file in *.csa, *.csb or *. csculpt_text formats . Keyboard shortcut: Ctrl+O;
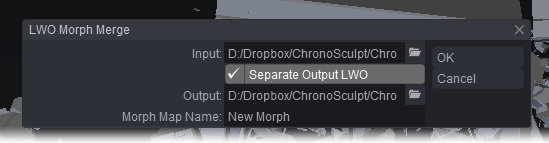
- Load Object - Loads an LWO, OBJ or Alembic file;
- Load Cache - Loads a geometry cache in MDD, Alembic or Autodesk Vertcache format;
- Save Project - This saves a CSculpt project file. Keyboard shortcut: Ctrl+S;
- Save Project As... - This saves the current project under a new name;
- Export MDD - Saves the currently selected object and its animation to an MDD geometry cache;
- Export Maya Cache - Saves a file in the Autodesk VertCache format;
- Export Frame to OBJ - Saves the current animation frame as a separate OBJ file
- Export to Endomorph - Saves the current animation frame as a LightWave EndoMorph. Good for creating facial morphs for lipsync or adding a final finesse to a dynamics simulation;
- Export Alembic - ChronoSculpt will save the object and cache files in one .abc file;
- About - Shows the splash screen seen at startup of ChronoSculpt. It can be dismissed by clicking the close icon at the top right of the window;
- Quit - Closes the program. Will give a warning if there are elements unsaved. Keyboard shortcut: Ctrl+Q
Edit
- Cut - Cuts the currently selected clip (Morph, Pin or Cache). Keyboard shortcut: Ctrl+X;
- Copy - Copies the currently selected clip (Morph, Pin or Cache). Keyboard shortcut: Ctrl+C;
- Paste - Pastes the currently selected clip (Morph, Pin or Cache). Keyboard shortcut: Ctrl+V;
- Delete - Deletes the currently selected clip (Morph, Pin or Cache). Keyboard shortcut: Del;
- Undo - Undoes the most recent action. Keyboard shortcut: Ctrl+Z;
- Redo - Redoes the most recent undo. Keyboard shortcut: Z;
- Clear History - Resets the Undo count to 0 and clears the memory required for Undos.
Tools
The entries in this group all have Radius, Strength and Hardness settings that can be changed using the HUD. The right mouse button can be used to change the Radius on the fly. Ctrl will do the opposite of the normal left mouse button action and Shift will smooth (where appropriate).
- Sculpt - This is probably the tool you’ll use most. Its equivalent in ZBrush is the Brush tool;
- Drag - Like the Dragnet tool in LightWave this tool creates a smooth falloff to the vertices affected by the drag operation. In ChronoSculpt you will notice that the manipulation of massive geometry files is a breeze;
- Pinch - This tool brings geometry together. You can expand the geometry using the Ctrl key modifier;
- Bulge - Expands or contracts geometry with a falloff. Clicking on the gizmo moves the zone of influence which is represented by the orange sphere, clicking elsewhere performs the operation. This can create some very interesting inflate and compress effects on objects;
Bulge creates a Morph unless used in Setup or Global Editing Mode. - Erase - This uses a brush interface to erase back to the base object by removing deformations and animation applied by cache files;
- Pin - Pins a separate geometry part where it is. For example, if you have a jitter on a group of dominoes after they fall to the ground due to the simulation having calculation errors you can use Pin to lock the dominoes to the table and remove the jitter quickly and easily and then resave your cache file out. You can also use Transform to move a stray object part out of the way and then use Pin to make sure that it doesn’t go back to its original location. By default, Pin has a small Ease In and lasts for the rest of the scene. This can be changed and an Ease Out applied so that the items you pinned resume life with a delay. You paint the areas you wish to Pin and painting the same areas again with the Keyboard modifier Shift will deselect.
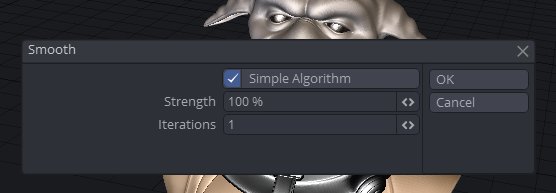
- Smooth All - A smoothing algorithm that can be applied with multiple iterations. This deforms the object by smoothing out the position of its vertices. It is most useful with organic geometry. The more geometry you have the more interesting it is to use the Simple Algorithm switch. Turning it off will attempt to better preserve volume, but when the geometry gets heavily polygonized the difference becomes much subtler and the Simple Algorithm will give quicker results. Smooth All creates a Morph unless used in Setup or Global Editing Mode;
- Transform - Move separate geometry - for example in a LightWave.LWO you can save many different “parts” within one LWO object. Transform tools will allow you to transform those individual parts. For example, a single shard of glass in a breaking window that hasn’t quite gone where you want it. Transform creates a Morph unless used in Setup or Global Editing Mode.
- XYZ Symmetry - You can choose which axis you’d like symmetry on. Multiple axes can be chosen.
Object
- Select Object - This allows you to click on a different object in your project, rather than just using the Ctrl+Tab shortcut or Switch Object File Menu option. Keyboard shortcut: Shift+S;
- Cycle Object - Switches between objects in your project. Keyboard shortcut: Ctrl+Tab;
- Remove Object - Deletes an object from your project.
View
- Fit All - Fits the extent of your entire scene into the viewport. Keyboard shortcut: A;
- Fit Selected - Fits the selected object into the viewport. Keyboard shortcut: Shift+A;
- Reset View - Resets the viewport to its initial display.
Globals
- Setup Mode - This is for modifying the base geometry throughout the animation, rather than just for a certain time. The object goes to its undeformed default state while you are in Setup Mode. For example, if this is a character it would be in the pose that it was modeled in before deformations are applied;
- Global Editing Mode - Global Editing Mode is not available within Setup Mode. However, if you are in Global Editing Mode you can also activate Setup Mode to show your geometry in its undeformed base state. Global Editing Mode is similar to Setup Mode, but you can edit at any point in the timeline and see how the deformation of your object will be affected by your modification, rather than only seeing the undeformed object;
- Tablet Mode - Changes cursor positioning from relative to absolute for use with graphics tablets;
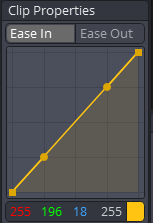
- Palette - The Palette is available only when you create a clip or have a clip selected. The clips on the timeline are colored in a certain way by default - a morph is orange-yellow, a pin is red and a geometry cache is light blue, but if you have several it’s good to color them differently to make the differences clear. The palette provides standard RGB values, but also an alpha to make differing transparencies;
- Ease In/Ease Out - This toggle allows you to set the in and out of a clip. If for instance, you’d like a change made to a scene element to become permanent, set the Ease Out to 100% by dragging the Control Point to the right and drag the end time for the clip to the end of the scene.