Installing LightWave
- Macintosh

System Requirements
- Hardware
Intel processor
- Operating System
Sierra 10.12 or better
- Graphics Card
NVIDIA® GeForce® 9 series or AMD Radeon HD 4000 series (minimum)
Minimum Screen Resolution: 1280 x 1024 pixels
Recommended Graphics card: GeForce 10 series or newer at 1920 x 1080 or better
Upgrading From a Prior Version
Those upgrading from an older version of LightWave 3D may have a USB hardware key (or parallel key on Windows systems), also known as a "dongle". LightWave no longer requires a hardware key, but you may still find one useful at times (as, for example, if you freelance at a firm with strict network policies).
Otherwise, the same installation instructions apply for an upgrade as for new users. The installation program will not delete any existing objects, scenes, or images on your system unless an existing item has the same name and is in the same directory as an item that LightWave 2019 installs. For this reason, you should install LightWave 2019 in a new directory.
NewTek strongly recommends that you backup your system before you install LightWave 3D.
Software Installation
Download and install the most recent version of LightWave for which you have a license here:
https://www.lightwave3d.com/account/.
If you don’t already have an account you can download the trial version found here:
https://www.lightwave3d.com/try_lightwave/ and then create one.
Installation Options
After accepting the EULA, you will be asked what type of installation you wish to perform. Choose the Render node entry if this installation is intended exclusively for rendering, rather than creating LightWave assets.
LightWave asks whether you wish to install Python Site Packages, leave them checked unless you have a specific reason to not want them since they will be expected by third-party Python scripts. If you say no to configuring Advanced Options for the NRC Service, you will be asked to provide a name for network rendering for your machine. The advanced options for the Network Render Controller start with the choice between an explicitly-launched Dock application or a System Service (or daemon) that runs at startup. Next, you are asked how you'd like your diagnostics output, and the question after pertains to how your machine will be referred to for network rendering. Lastly, there is a question referring to UNC mapping for network drive use. After these questions are answered or ignored, the installation will commence.
A symbolic link to the LightWave configuration files will be created in the Documents folder to allow easy access for licensing and clearing configs.
Legacy Plugins
LightWave has a long and rich history and many plugins from that history. If you find yourself needing a legacy plugin for resurrecting an old project or similar, you will find a file called legacy.zip in the support\plugins folder.
Running the Program
LightWave 3D is started the same way as any other program on the particular platform on which it’s installed. LightWave 3D has two major applications that work together - Layout and Modeler - the icons for which are located in the LightWave folder. Each program can be started independently; however, you may also access them by clicking the appropriate button on their respective interfaces.
Mac Customization
OS X: Running Without the Hub
Layout and Modeler communicate with each other to keep assets and other data synchronized. Normally, this is accomplished via the "Hub". The Hub is an application (Hub.app) that passes messages and data between applications connected to it. Normally, Layout and Modeler automatically ensure the Hub is started and attempt to communicate
with it.
Some users may want to use this form automatic data exchange mechanism. They might want to work on different projects in each application, prefer to synchronize data manually (by saving and loading files), or avoid some local issue involving the Hub’s communication protocol.
In such cases, there are several ways to prevent the Hub from launching when Layout and Modeler or started.
- Prevent the Hub from being found. The Hub is an application called "Hub.app". Renaming it to something different prevents it from being found by Layout and Modeler; and they will not be able to connect with it.
- Start Layout and Modeler with command line arguments from Terminal. Terminal is an application built-it to macOS that allows users access to the command line arguments that Layout and Modeler offer. Terminal uses the keyboard to execute commands. Some familiarity with the Terminal is required for this approach.
- Create a "bash" script that, when double-clicked from Finder, will launch Layout or Modeler with the desired command line arguments. Both TextEdit and Terminal are used in this procedure.
Create a Script for Starting Layout without the Hub
This approach can be used for "Layout.app" and "Modeler.app". For Modeler, just replace occurrences of "Layout" with "Modeler".
- Launch /Applications/TextEdit by double-clicking its icon.
- Enter the following text into the edit window. Please note that it is important to have the ".app" extension included in the filename. The location of your LightWave installation may differ, so adjust as needed.
#!/bin/sh
open /Applications/NewTek/LightWave3D_2018.0.6/Layout.app --args -0

3. Make sure the format is set to plain text. Use the menu "Format | Make Plain Text", if necessary.
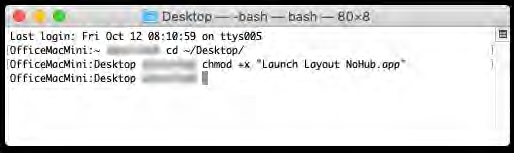
4. Save the text file to your desktop as "Launch Layout NoHub.app". Make sure to avoid using a ".txt" extension when saving.
5. Open a Terminal window using the /Applications/Utilities/Terminal application.
6. The script must be 'executable' so it will launch as a command when double-clicked with the mouse instead of opening as a text file. Make sure the current working path is the desktop (enter "cd ~/Desktop" if necessary) then enter this command.
chmod +x "Launch Layout NoHub.app"
Note that on some OS configurations, you may need to prefix the file name with "./", or, to avoid using quotes, the spaces in the file name need to be escaped (i.e., a "\" before them). So, either this: chmod +x "./Launch Layout NoHub.app" or this: chmod +x ./Launch\ Layout\ NoHub.app may need to be used instead.
7. Now, you can double-click the icon to launch Layout without the Hub.
OS X Special Menu
The Macintosh version of LightWave features a titlebar menu labeled Special which hosts a number of Mac-specific options.
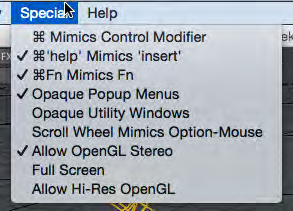
⌘ Mimics Control Modifier
On by default. With this option on, the command key (⌘) can be used instead of the Ctrl key for Ctrl key shortcuts, like Ctrl-L for Limited Region. Be aware there can be a conflict when ⌘Fn Mimics Fn is also on for Ctrl-Fn key shortcuts, like Ctrl F5 for the Effects window.
⌘ 'help' Mimics 'insert'
On by default. The Insert key on a Windows keyboard pauses playback of a scene, but a Macintosh keyboard doesn't always have one. This entry enables the Macintosh Help key to replace the Insert key.
⌘ Fn Mimics Fn
On by default. On some Macintoshes, hitting the Function key uses a system-wide utility like raising or lowering volume. Using this entry enables direct function key use for shortcuts, like F5 for the Surface Editor.
Opaque Popup Menus
On by default. When off, popup menus and dropdown lists have a slightly transparent feel.
Opaque Utility Windows
Off by default. When enabled LightWave panels that cover any portion of the main window will become semi-transparent during mouse manipulations within the main window. This helps with viewport manipulations without moving the obscuring panels.
Opaque Utility Window off
Lightwave docs
25 second video
Scroll Wheel Mimics Option-Mouse
Off by default. This allows a mouse bi-directional scroll wheel/ball to manipulate viewports as if holding the option key while click-dragging the mouse pointer. This aids in viewport navigation.
Allow OpenGL Stereo
Off by default. Some Macs have display adapters that are capable of Stereo OpenGL (quad buffers). Enabling this feature on display adapters that do not support it can be risky, so this feature is disabled by default. A restart of LW is required when changing this setting.
Full Screen
Off by default. When on, LightWave fills the screen completely including the menu bar. The mouse needs to be moved to the top of the screen to see menus.
Allow Hi-Res OpenGL
Although LightWave 2019 supports HiDPI monitors automatically now, this menu choice is still a valid one. If your graphics card is not powerful enough, leaving this menu item in its default Off state may result in a faster OpenGL display. Layout must be restarted after changing this setting.