LW video tutorials
Video training
Defined chapters
All chapters
| Image | Content |
|---|---|
|
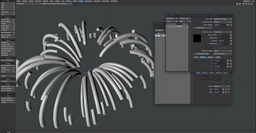
Motion Graphics FiberFXMotion Graphics FiberFX in LightWave 3D introduces an innovative approach to adding lifelike hair, fur, and fibrous textures to 3D models, enhancing the realism and dynamism of motion graphics projects. This feature is particularly adept at creating detailed, animated effects that mimic the natural movement and flow of hair and fur, making it an invaluable tool for artists aiming to inject a higher degree of realism into their animations. With FiberFX, users can control various aspects of the fibers, such as thickness, length, curliness, and color, allowing for a wide range of creative possibilities. Beyond traditional applications like hair and fur, FiberFX can be creatively repurposed to generate fantastical effects, such as animated grass fields swaying in the wind or other fibrous materials that require nuanced motion and texture. |
|
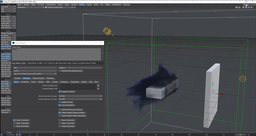
Tyres to the Tarmac Part 2 TerrainCrafting a vibrant 3D scene, centered around an ice cream van navigating through a meticulously designed landscape. The tutorial begins with the assembly of fundamental elements such as the ice cream van itself, a ground plane, control points for navigation, the roadway, and a foundational van base. Key steps illustrated include the strategic organization and grouping of the van's components for simplified manipulation, and the innovative use of spline control to direct the van's movement along a predetermined path. This technique is complemented by the application of bones to the road, allowing it to seamlessly conform to the varying elevations of the terrain. The instructor also delves into how to finesse the ground and road's displacement to ensure the van base not only follows the spline accurately but also adapts its form according to the terrain's contours. |
|
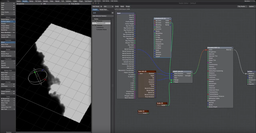
Native FalloffsNative falloffs in LightWave 3D represent a versatile and powerful feature that enhances the way textures, deformations, and other effects are applied to objects within a scene. This functionality allows artists to control how these effects gradually change or fade over the surface of a model, based on distance, angle, or other criteria. For instance, a texture can smoothly transition from one color to another across the surface of an object, or a deformation can become less pronounced as it moves away from a specified point of origin. The beauty of native falloffs lies in their ability to mimic real-world phenomena, such as how light naturally fades into shadows or how materials change appearance based on their angle relative to the viewer. This capability significantly boosts the realism and dynamism of 3D animations and renders. Artists can fine-tune the falloffs to achieve subtle gradations or dramatic shifts, providing a high degree of creative control over the look and feel of their projects. In practical applications, native falloffs in LightWave 3D can be used to create effects such as the soft edge of shadows, the gradual wear and tear on objects that gives them a more realistic look, or atmospheric effects like fog that increases in density with distance. |
|
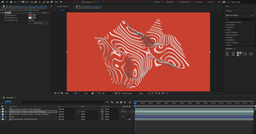
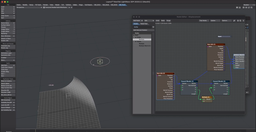
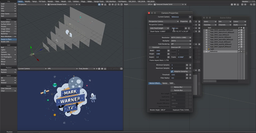
Intersecting Edges, After Effects, Element 3D Trapcode FormIntersecting Edges within LightWave 3D, along with the integration of After Effects, Element 3D, and Trapcode Form, highlights the advanced capabilities of combining 3D modeling, animation, and visual effects to create complex and visually striking scenes. This integration allows artists to seamlessly blend the precision and detail of LightWave 3D's modeling and animation tools with the dynamic visual effects and motion graphics capabilities of After Effects. Element 3D serves as a bridge, enabling users to import 3D objects from LightWave into After Effects, where they can be manipulated and animated in a more composition-focused environment. Trapcode Form further enriches this workflow by adding particle-based effects, allowing for the creation of intricate animations that can interact with the 3D models, such as morphing shapes or flowing movements that react to the geometry of the models, including their intersecting edges. This synergy provides a powerful toolkit for creators looking to push the boundaries of 3D animation and visual effects, making it possible to create detailed, dynamic scenes that were previously difficult or time-consuming to achieve. |
|
Page CurlLightWave 3D's Page Curl effect is a fascinating tool used to simulate the realistic curling or turning of a page or any flexible surface within a 3D environment. This feature is particularly useful for animators and graphic designers looking to add a dynamic and lifelike element to digital books, magazines, or any project that requires the animation of paper or fabric moving in a natural manner. By manipulating the curl's radius, angle, and direction, users can achieve a wide range of movements, from gentle turns to rapid flips. The Page Curl effect in LightWave 3D allows for a high degree of control, enabling artists to fine-tune the movement to match the desired outcome, whether for a subtle detail in a complex animation or as a focal point in a project. This tool exemplifies the powerful capabilities of LightWave 3D in creating detailed and convincing animations that mimic real-world physics. |
|
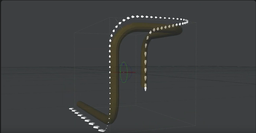
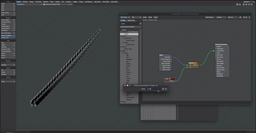
Follow the Dots ..........The video is a comprehensive guide on using LightWave 3D to depict direction and movement in technical illustrations. It focuses on employing arrows and dashed lines for this purpose, offering a step-by-step approach to mastering these techniques. Basic Setup: It begins with setting up a simple arrow and dash to symbolize direction, showing how to disable these elements for rendering and replicate them along a path using instances. Creating Motion Paths: Create a motion path by modifying a null object's position and rotation over time, using this path to align arrow instances to signify direction. It covers how to adjust instance numbers, separation, and alignment. Using Dashes and Arrows Together: How to merge arrows with dashed lines for a complex motion representation, involving the substitution of the arrow object with dashes and adding a leading arrow instance, adjusting its position and scale accordingly. Static Arrows Along a Path: For non-animated arrows, it shows how to place static arrows along a motion path, allowing for easy path shape adjustments and arrow distribution. Emphasizing Specific Parts of the Path: How to highlight path sections by scaling arrows at particular points, using keyframe scaling and instance distribution adjustments. Illustrating Fluid Motion Through a Pipe: A complex example of showing fluid motion through a pipe is presented, involving creating a spline along the pipe as a path for arrows. It addresses challenges in arrow rotation control and offers manual orientation adjustment solutions. Advanced Control Over Arrow Orientation: The tutorial wraps up with sophisticated strategies for arrow orientation control along a path, including rotation keyframing and rotation order adjustments to bypass limitations. |
|
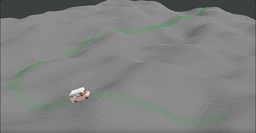
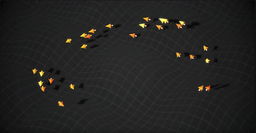
Flocking: Ray Cast to GroundIn LightWave 3D, "Flocking: Ray Cast to Ground" refers to a specialized technique within the software's flocking system that allows for the simulation of cohesive group movement behaviors among characters or objects, with an added layer of interaction with the ground or terrain. Flocking systems are commonly used to simulate the natural, coordinated movement found in groups of animals, such as birds, fish, or herding animals. The addition of ray casting to ground interactions enhances this simulation by ensuring that the flock members adapt their movements based on the terrain below them, adding realism to the scene. Ray casting is a technique used to calculate the line of sight interactions between objects in a 3D environment. In the context of flocking to the ground, ray casting is employed to dynamically measure the distance between each member of the flock and the ground beneath them. This allows the simulation to adjust the altitude of each flock member to follow the contours of the terrain, preventing them from intersecting with the ground and enabling them to navigate around obstacles or adjust their altitude based on the landscape. By integrating ray casting with flocking behaviors, LightWave 3D allows creators to simulate complex scenarios where flocks of creatures or objects move realistically across varied terrains. For example, a flock of birds can be animated to fly across a mountainous landscape, with each bird adjusting its height according to the undulating terrain below, or a herd of animals can navigate through a rolling meadow, with their movements and positions dynamically adjusted to maintain a realistic interaction with the ground. This technique not only adds a layer of visual realism but also significantly simplifies the animation process for scenes involving complex group movements over uneven terrains. Animators can define general behaviors and movement parameters for the flock as a whole, and the "Flocking: Ray Cast to Ground" feature automatically handles the intricate details of terrain interaction, freeing up creative resources to focus on other aspects of the scene. |
|
Speed Lines, Inertia, and FiberFXIn LightWave 3D, combining Speed Lines, Inertia, and FiberFX offers a unique and powerful set of tools for creating dynamic visual effects that convey motion and energy within a scene. This trio of features enables artists to enhance the realism and artistic flair of their animations, particularly when depicting fast-moving objects or characters. Speed Lines are a visual effect used to emphasize the direction and velocity of an object's movement. In animation and comics, these lines create a sense of speed and momentum, guiding the viewer's eye and adding dramatic effect. In LightWave 3D, speed lines can be generated to accompany moving objects, giving a visual cue to their velocity and path of motion. This is particularly useful in action scenes or whenever a sense of rapid movement is desired. Inertia, in the context of LightWave 3D, refers to the physical principle that an object in motion tends to stay in motion unless acted upon by an external force. This can be simulated in animations to add realism to the movement of objects. By accurately modeling inertia, animations can reflect the natural resistance of objects to changes in their state of motion, making them feel more grounded in the physical world. This is crucial for scenes where objects start, stop, or change directions, ensuring that their movements adhere to the laws of physics. FiberFX is a feature in LightWave 3D designed for creating detailed fibrous structures like hair, fur, grass, or feathers. When combined with speed lines and inertia, FiberFX can be used to add dynamic secondary animations to characters or objects. For instance, the hair or fur on a character can be made to respond realistically to their movements and speed, flowing or fluttering in accordance with their inertia. This adds a layer of complexity and realism to the animation, as the fibrous elements interact naturally with the environment and the actions of the characters. Together, Speed Lines, Inertia, and FiberFX enable creators to craft scenes that are visually compelling and rich in detail. Whether it's the blur of a superhero speeding to save the day, the realistic bounce and sway of a character's hair as they move, or the dramatic tension of an action scene, these tools offer a comprehensive suite for enhancing the visual storytelling in LightWave 3D projects. |
|
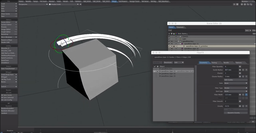
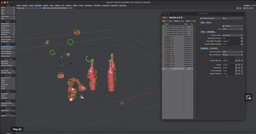
Particles to Bullet Dynamics : Breaking BottlesIn LightWave 3D, the process of transforming particles into bullet dynamics to simulate the breaking of bottles represents a sophisticated technique that combines the software's particle system with its powerful physics engine. This approach enables artists to create highly realistic simulations of bottles or similar objects shattering upon impact. The process begins with the particle system, where particles are used to define the initial positions and trajectories of the fragments or shards that a bottle would break into. These particles serve as the basis for the simulation, dictating how each piece will initially move when the bottle breaks. The transition to bullet dynamics involves converting these particle-driven movements into rigid body physics simulations. Bullet dynamics in LightWave 3D is known for its ability to accurately simulate real-world physics, including collisions, gravity, and the complex interactions between shattered pieces. By applying bullet dynamics to the particles, each shard behaves as a solid object, colliding with other shards and the environment in a believable manner. This method allows for the detailed and realistic animation of the breaking process, capturing the chaotic nature of glass shattering. Artists can control various parameters within this workflow, such as the force of impact, the strength of the bottle material, and environmental factors like wind or obstacles, to achieve the desired effect. The combination of particles for initial fragmentation and bullet dynamics for physical interactions provides a comprehensive toolkit for simulating the breakage of bottles and similar objects in LightWave 3D, offering a balance between artistic control and physical accuracy. This capability is particularly valuable in visual effects and animation, where the realism of such dynamic events significantly enhances the viewer's experience. |
|
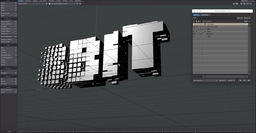
Instance Generator and Time Offsets Part 1: Position, Rotation, and ScaleIn LightWave 3D, "Instance Generator and Time Offsets Part 1: Position, Rotation, and Scale" delves into the foundational aspects of creating and managing instances within a 3D environment, focusing on the essential parameters that determine the spatial characteristics and transformations of these instances. The Instance Generator is a powerful tool in LightWave 3D that facilitates the creation of multiple instances of an object, enabling the efficient population of scenes with repetitive elements without the overhead of increased memory use. Each instance can be individually controlled in terms of its position, rotation, and scale, allowing for a diverse and dynamic arrangement of objects that can significantly enhance the visual complexity of a scene. Time Offsets introduce a temporal dimension to the manipulation of instances, allowing for the animation of each instance to occur at different times or speeds, even though the animation itself might be identical. This is particularly useful for creating natural-looking movements within groups of objects, such as a flock of birds taking off, where each bird (instance) might start its flight at a slightly different time and perhaps follow a slightly varied path or orientation. The combination of position, rotation, and scale adjustments with time offsets allows for a highly nuanced control over the behavior of instances in a scene. For example, an animator could create a scene with falling leaves where each leaf (instance) follows a unique path to the ground, rotates as it falls, and scales down as it moves away from the viewer, all starting at slightly different times to mimic the randomness of nature. This level of control is instrumental in adding realism and depth to animations, making "Instance Generator and Time Offsets Part 1" an essential technique for animators and visual effects artists working with LightWave 3D. |
|
Instance Generator and Time Offsets Part 2: Morphs and MDD'sIn LightWave 3D, "Instance Generator and Time Offsets Part 2: Morphs and MDD's" represents an advanced application of instance generation combined with the flexibility of morphing and Motion Designer Displacement (MDD) files to create highly detailed and dynamic animations. This combination allows for the creation of instances not just as static duplicates, but as entities capable of undergoing transformations and exhibiting unique animations over time. The Instance Generator is a powerful feature that allows for the efficient replication of objects within a scene. When combined with Time Offsets, these instances can be animated to start or move at different times, creating a more natural and less repetitive animation. This is particularly useful in scenarios where you want to simulate natural movements within a crowd or variations in a natural phenomenon, like waves or a field of flowers swaying in the wind. Integrating Morphs into this workflow introduces the ability to seamlessly transition instances between different shapes or states. Morphing in LightWave 3D is a technique that interpolates an object's vertices from one shape to another, allowing for smooth transformations. This can be used to add an extra layer of realism to instances, as each one can subtly or drastically change its form over time, independent of the others. MDD files bring another dimension to the animation process by storing vertex motion data. This allows for complex animations created through simulations or keyframe animations to be applied to instances. When combined with Time Offsets, MDD animations can be staggered or looped across instances, enabling intricate patterns of movement and transformation that would be incredibly time-consuming to animate individually. By leveraging the Instance Generator with Time Offsets, Morphs, and MDD's, LightWave 3D users can create complex scenes filled with dynamically animated objects. This could be used, for example, to animate a forest where each tree not only sways individually with the wind (using Time Offsets and MDD's) but also goes through seasonal changes in shape and foliage (using Morphs), all efficiently managed through instances. This approach significantly enhances the realism and vibrancy of animations, providing creators with a powerful set of tools to bring their visions to life in LightWave 3D. |

|
Instance Generator Animation TipsThe Instance Generator Animation feature in LightWave 3D is a formidable tool for creating intricate and dynamic animations that involve multiple copies or instances of objects. This feature allows animators to generate a multitude of instances from a single source object, enabling the creation of complex scenes such as swarming creatures, animated foliage, or urban landscapes filled with vehicles and pedestrians, all while maintaining a manageable workflow and efficient use of system resources. What sets the Instance Generator apart in animation workflows is its ability to not only duplicate objects but also to imbue these duplicates with individual behaviors and animations. This can include variations in movement, rotation, scale, and even morphological changes over time, all driven by the animator's specifications. The generator can be controlled through a variety of parameters and inputs, such as using weight maps, textures, or procedural patterns to influence the distribution, orientation, and animation of instances. This allows for a high degree of control over the randomness and variation of instance behaviors, making animations appear more natural and less repetitive. |
|
Instances, Time Offset, and a Little RaycastingIn LightWave 3D, the integration of "Instances, Time Offset, and a Little Raycasting" offers a powerful set of tools for animators and visual effects artists to create complex scenes and animations with high efficiency and realism. Instances in LightWave 3D allow for the duplication of objects within a scene without significantly increasing memory usage, making it ideal for creating large-scale scenes such as forests, crowds, or any scenario where multiple copies of the same object are needed. The Time Offset feature is crucial when working with instances or multiple objects, as it allows for the animation of these duplicates with individual timing, creating more dynamic and complex motions. This can be used to simulate natural variations in a group of moving entities, like leaves fluttering in the wind or the synchronized movements of a school of fish, without manually animating each instance. Raycasting adds another layer of realism and interaction by enabling objects to detect and react to their surroundings within the 3D space. This technique involves casting rays from a point to detect intersections with other objects in the scene, which can be used for a myriad of purposes such as determining line of sight, creating shadows, or simulating light reflection and refraction. When combined, these features enable creators to produce scenes with a high degree of complexity and realism. For instance, one could use instances to create a field of grass that sways in the wind with varied timing to avoid uniform motion, while raycasting could be used to ensure that the shadows and lighting on the grass are accurately calculated based on the position of the sun and any other objects in the scene. This synergy between instances, time offset, and raycasting in LightWave 3D opens up endless possibilities for creativity and innovation in digital content creation. |

|
Fluid Channel Gradient Back in ActionIn LightWave 3D, the concept of "Fluid Channel Gradient Back in Action" refers to the utilization of gradient parameters within the dynamics of fluid simulations, specifically in the context of channel and flow control. This technique leverages gradients, which are essential for defining variations in properties such as density, viscosity, and velocity across different regions of the fluid. By adjusting these gradients, artists can achieve highly realistic fluid behaviors that mimic real-world fluid dynamics. For instance, a fluid channel's gradient can be manipulated to create effects like varying fluid speed within a stream or differences in material properties like oil mixing with water. |
|
Fluid Pressure Normal Force Velocity WeightFluid pressure, normal force, velocity, and weight are fundamental concepts in physics that find practical applications in LightWave 3D.
Understanding and manipulating these physical concepts in LightWave 3D allows for the creation of more dynamic, realistic, and compelling 3D scenes, animations, and effects, by closely mirroring the behavior of real-world phenomena. |
|
Multiplane CompositingMultiplane compositing in LightWave 3D is a powerful technique that enables artists to create complex scenes with depth and realism by layering multiple 2D and 3D elements in a 3D space. This method involves separating different elements of a scene into various planes or layers, which can then be individually controlled and manipulated. By adjusting the position, scale, and rotation of these layers in relation to the camera, artists can achieve a sense of depth and parallax, making the scene feel more dynamic and immersive. LightWave 3D's robust rendering and compositing tools allow for seamless integration of these layers, enabling the addition of effects such as lighting, shadows, and depth of field to further enhance the realism of the composition. This technique is particularly useful in visual effects and animation, where it can be used to composite CGI elements with live-action footage or to create intricate animated scenes that would be difficult to achieve with traditional 3D modeling alone. |